Version note
This article was written for NKP 2.17. The current release is 2.18. See the Upgrade to NKP 2.18 series for the latest guidance.
In Part 1, we covered NKP's architecture, cluster types, and platform services. Now it's time to deploy.
This guide walks through everything you need to stand up an NKP 2.17 management cluster on Nutanix AHV using the internet-connected method. By the end, you'll have a running cluster with Kommander and all platform services deployed, and the dashboard accessible. Part 3 will cover air-gapped deployment for regulated environments where internet access isn't an option.
Prerequisites
What You Need on Nutanix
Before touching the nkp CLI, make sure your Nutanix environment is ready.
| Requirement | Details |
|---|---|
| Prism Central | pc.7.3 or pc.7.5, accessible on port 9440 |
| AOS | 7.3 or 7.5 on the target PE cluster |
| PE Cluster | Sufficient CPU, RAM, and storage for the deployment |
| Subnet | Created in Prism Central (VLAN-backed, with IPAM or DHCP) |
| Storage Container | On the PE cluster, used by the Nutanix CSI driver for persistent volumes |
| NKP OS Image | Pre-built Rocky Linux 9.7 image uploaded to PC (CIS-hardened, includes K8s 1.34.x) |
Important
NKP cluster deployment is not supported on a dual-stack enabled Prism Central. X-Small Prism Central is also not supported for NKP Marketplace deployments.
Prism Central Credentials
Nutanix recommends creating a dedicated Prism Central user for NKP rather than using the default admin account. The user needs a custom role with these minimum permissions:
| Category | Required Permissions |
|---|---|
| AHV VM | Create, Delete, View Virtual Machine; View Virtual Machine Disk |
| Category | Create Or Update Name Category; Create Or Update Value Category; Delete Name Category; Delete Value Category; View Name Category; View Value Category |
| Cluster | View Cluster |
| Host | View Host |
| Image | View Image |
| Prism Central | View Prism Central |
| Project | View Project |
| Subnet | View Subnet |
| Volume Group | Detach Volume Group From AHV VM |
| VPC | View VPC |
| Overlay Subnet | View Overlay Subnet (only if Flow Networking is enabled) |
NKP uses the PC credentials for three internal components:
- CAPX: listing subnets and creating VMs
- CSI: managing persistent storage (Nutanix Volumes / Files)
- CCM: discovering node metadata from Prism Central
The credentials are stored as Kubernetes secrets in several namespaces: global-nutanix-credentials in capx-system, nutanix-csi-credentials in ntnx-system, and nutanix-ccm-credentials in kube-system.
Resource Sizing
Resource sizing depends on your license tier and cluster role. These are the minimum requirements from the NKP 2.17 guide:
Starter License (Nutanix AHV only)
| Cluster Role | Node Role | Count | vCPU | RAM | Disk |
|---|---|---|---|---|---|
| Management | Control Plane | 3 | 2 | 8 GiB | 80 GiB |
| Management | Workers | 2 | 4 | 8 GiB | 80 GiB |
| Managed | Control Plane | 3 | 2 | 6 GiB | 80 GiB |
| Managed | Workers | 2 | 3 | 6 GiB | 80 GiB |
Pro / Ultimate License
| Cluster Role | Node Role | Count | vCPU | RAM | Disk |
|---|---|---|---|---|---|
| Management | Control Plane | 3 | 4 | 16 GiB | 80 GiB |
| Management | Workers | 4 | 8 | 32 GiB | 80 GiB |
| Managed | Control Plane | 3 | 4 | 12 GiB | 80 GiB |
| Managed | Workers | 4 | 8 | 12 GiB | 80 GiB |
Warning
If you start with Starter-tier sizing (2 workers, 8 GiB RAM) and later apply a Pro or Ultimate license, the additional platform services will fail due to insufficient cluster resources. Size for your target license from the start.
Note
In our ITCS lab, we deploy on PE cluster PIKACHU with subnet pika-vlan52-workloads and storage container nkp. With an Ultimate license, worker nodes get 8 vCPU and 32 GiB RAM to handle the full Kommander stack (Prometheus, Loki, Grafana, Traefik, Dex, and friends) without hitting Out of Memory (OOM) constraints.
Storage Container
The storage container specified with --csi-storage-container must exist on the same Prism Element cluster as your compute nodes. If you use failure domains across multiple PE clusters, the storage container must exist with the same name on every PE cluster. The CSI driver searches for it by name.
NKP creates a default StorageClass called nutanix-volume with these settings:
| Parameter | Default |
|---|---|
reclaimPolicy |
Delete |
volumeBindingMode |
WaitForFirstConsumer |
hypervisorAttached |
ENABLED (better I/O performance) |
flashMode |
DISABLED |
csi.storage.k8s.io/fstype |
ext4 |
allowVolumeExpansion |
true |
You can disable hypervisor-attached volumes at cluster creation with --csi-hypervisor-attached-volumes=false, but for most deployments the default (enabled) gives better performance since the disk is directly attached to the VM's SCSI controller rather than going through iSCSI over the network.
Network Planning
You'll need a few IPs reserved before you start. These must be outside your DHCP/IPAM pool to avoid conflicts.
| Purpose | Count | Example |
|---|---|---|
| Control plane VIP (kube-vip) | 1 IP | 10.12.52.220 |
| MetalLB range (LoadBalancer services) | 1+ IPs | 10.12.52.221-10.12.52.221 |
| Node IPs | 7+ (3 CP + 4 workers) | From DHCP/IPAM pool |
For the management cluster, a single MetalLB IP is enough. Only Traefik needs a LoadBalancer-type service to expose the platform applications (Kommander dashboard, Grafana, Prometheus, etc.), no application workloads run here. The --kubernetes-service-load-balancer-ip-range flag always expects a range format, even for a single IP (e.g., 10.12.52.221-10.12.52.221).
The control plane VIP is managed by kube-vip, which runs as a static pod on each control plane node. It uses ARP mode to advertise the VIP: one control plane node "owns" the VIP at any given time, and kube-vip uses Kubernetes leader election to handle failover. This means the VIP must be on the same L2 network as your control plane nodes.
Note
Nutanix recommends using an external load balancer as the control plane endpoint when one is available. kube-vip is the built-in fallback for environments without a dedicated LB. On pre-provisioned clusters, kube-vip is only deployed when you use --virtual-ip-interface. Omitting it means kube-vip is not deployed, letting you point --control-plane-endpoint-host at an external LB instead. On the Nutanix AHV provider, kube-vip is always used for the internal VIP, but you can additionally set --control-plane-external-endpoint to expose the API server via a floating IP or external DNS for out-of-VPC access.
Pod and Service CIDRs
NKP uses these default CIDRs:
| Network | Default CIDR | Capacity |
|---|---|---|
| Pod network | 192.168.0.0/16 |
~65,000 pod IPs |
| Service network | 10.96.0.0/12 |
~1,000,000 service IPs |
Important
Pod and service CIDRs cannot be changed after cluster creation. Make sure they don't overlap with each other, with your node subnets, or with any corporate network ranges. If you need custom CIDRs, set them during cluster creation with --kubernetes-pod-network-cidr and --kubernetes-service-cidr.
Firewall Rules
NKP nodes need network access to several services. Plan your firewall rules accordingly:
| Destination | Port | Protocol | Purpose |
|---|---|---|---|
| Prism Central VIP | 9440 | TCP/HTTPS | PC API (CAPX, CSI) |
| PE Data Services IP | 3260 | TCP | iSCSI data discovery (CSI Volumes) |
| PE Data Services IP | 3205 | TCP | iSCSI control target portal (CSI Volumes) |
| DNS server | 53 | TCP/UDP | Name resolution |
| NTP server | 123 | UDP | Time sync |
| Container registries | 443 | TCP/HTTPS | Image pulls (Docker Hub, gcr.io, quay.io, etc.) |
| Inter-node (Cilium) | 4240 | TCP | CNI health checks |
| Inter-node (Cilium) | 8472 | UDP | VXLAN overlay |
| Inter-node (Cilium) | 4244, 4245 | TCP | Hubble observability |
Tip
Plan your IP allocation before starting. You'll need the control plane VIP during cluster creation, and changing it later means redeploying. The MetalLB range can be updated post-deployment if needed.
Jump Host Setup
The jump host is where you run the nkp CLI. It needs a container runtime because the bootstrap process spins up a temporary KinD cluster.
Requirements:
- Linux or macOS
- Docker 27.4.0+ (or Podman 4.0+)
- 8 GiB RAM available for Docker
- Internet access to container registries
Tip
You can use the NKP Node OS Image itself to deploy a bastion VM on AHV. Create a VM from the same .qcow2 image, attach a custom cloud-init configuration to set up your user, SSH keys, and install Docker, and you have a ready-made jump host on the same network as your future NKP nodes. This is especially useful in air-gapped environments where the bastion needs to be inside the isolated network.
Download the nkp binary from the Nutanix Portal. Select NKP from the dropdown and grab NKP for Linux (or macOS):
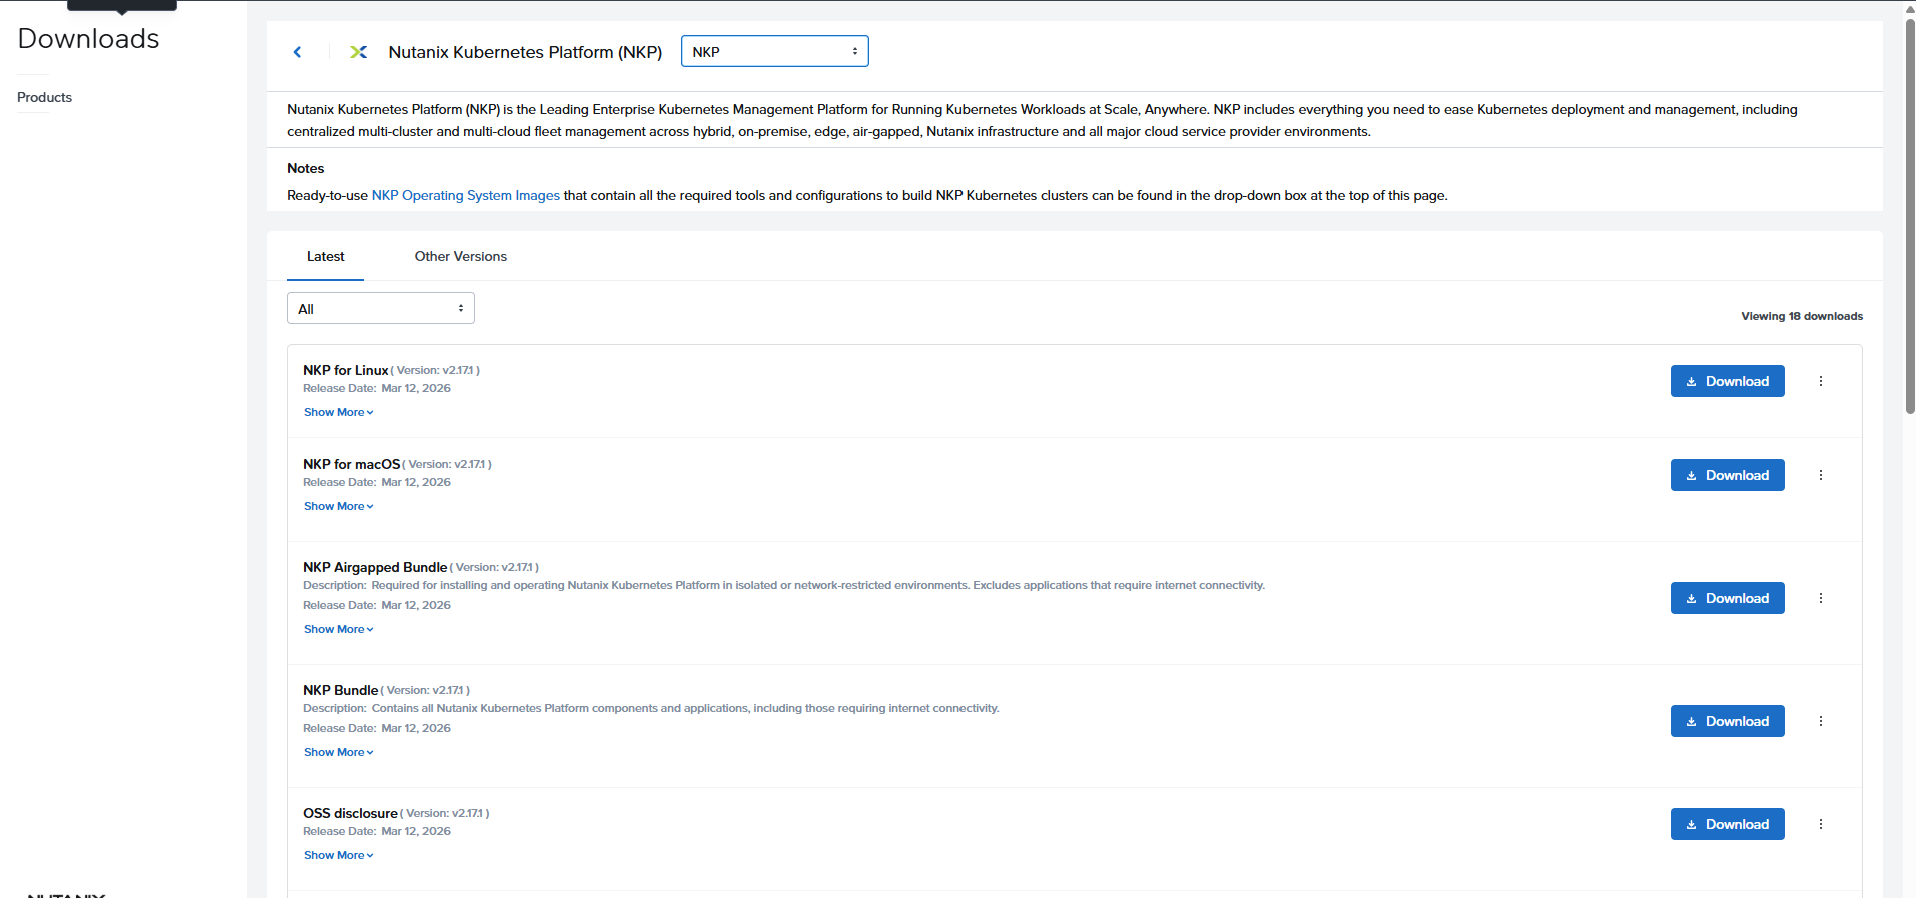
Extract and install it:
tar -xzvf nkp_v2.17.1_linux_amd64.tar.gz
sudo mv nkp /usr/local/bin/
nkp version
nkp version v2.17.1
Upload the NKP OS Image
Download the pre-built NKP Node OS Image from the Nutanix Portal. Switch the dropdown to NKP Operating System Images and download the Rocky Linux 9.7 - CIS Hardened for AHV image (v2.17.1):
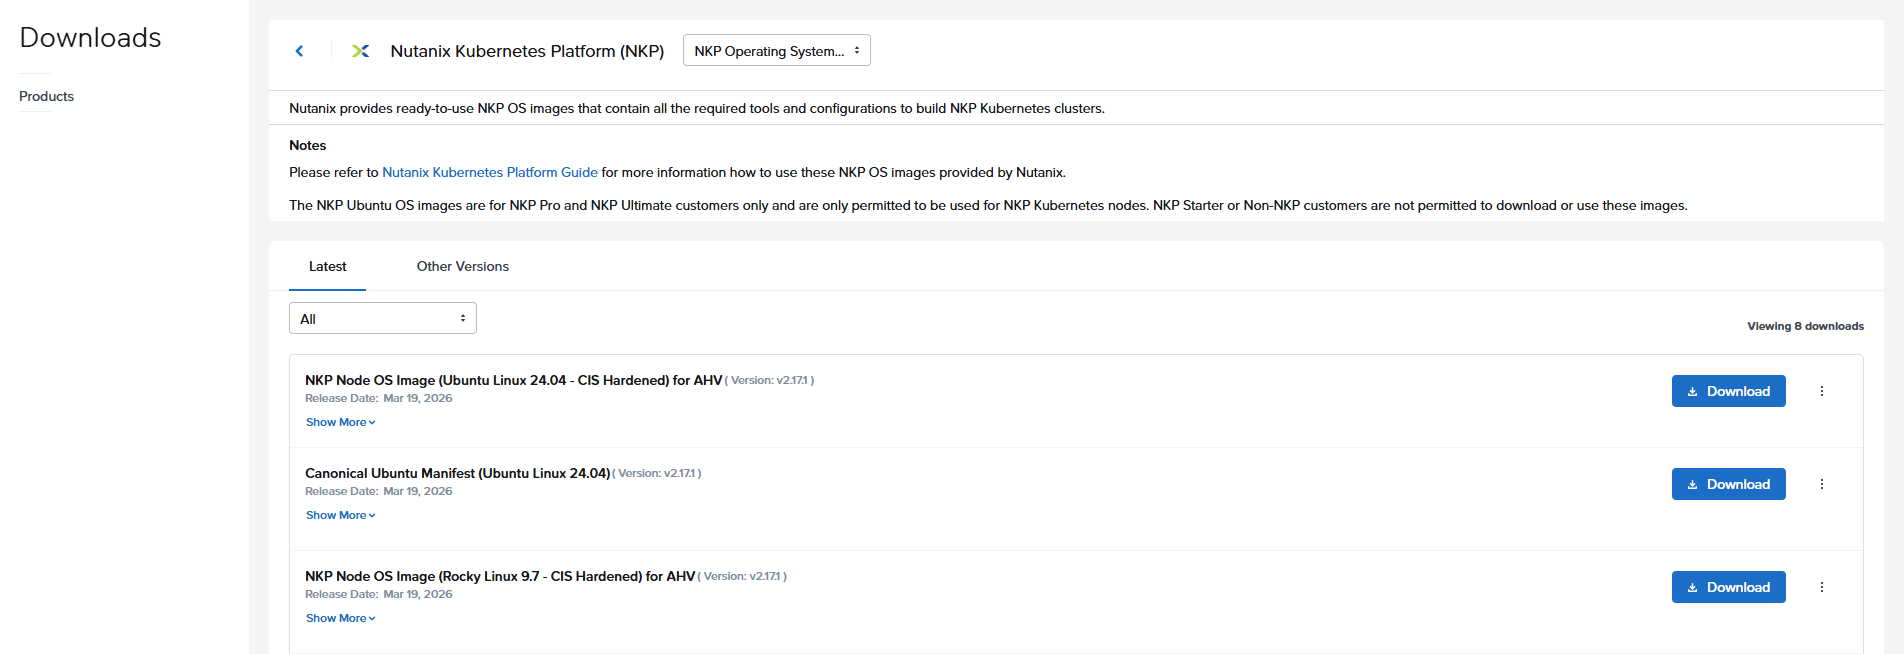
The pre-built images come CIS Level 1 hardened at the OS layer, while the NKP and Kubernetes components follow CIS Level 2 hardening guidelines. They include all the tools and configurations needed for NKP Kubernetes nodes: kubeadm, kubelet, containerd, and the CNI/CSI prerequisites.
Note
Not every image is CIS-hardened. Pre-built images come in two flavors: hardened variants carrying the release-cis token in the name (e.g. nkp-rocky-9.7-release-cis-1.34.3-20260504011927.qcow2, CIS Level 1 at the OS layer) and standard non-hardened variants. Custom images built with NIB can be hardened too: pass an overrides file with cis: true at build time (nkp create image nutanix ... --overrides overrides.yaml). If you need CIS Level 2 at the OS layer, take the Bring-Your-Own (BYO) OS approach and apply the Level 2 benchmark yourself.
Available OS images for NKP 2.17 on Nutanix AHV:
| OS | Pre-built | GPU Support | FIPS Support |
|---|---|---|---|
| Rocky Linux 9.7 (default) | Yes | No | No |
| Ubuntu 22.04 | No | Yes | No |
| Ubuntu 24.04 | Yes | Yes | No |
| RHEL 8.10 | No | Yes | Yes |
| RHEL 9.6 | No | Yes | Yes |
Pre-built images (Rocky Linux 9.7 and Ubuntu 24.04) are ready to download from the portal. For Ubuntu 22.04, RHEL, or any OS requiring GPU drivers or FIPS compliance, you build a custom image with NIB.
Upload the .qcow2 file to Prism Central as a disk image:
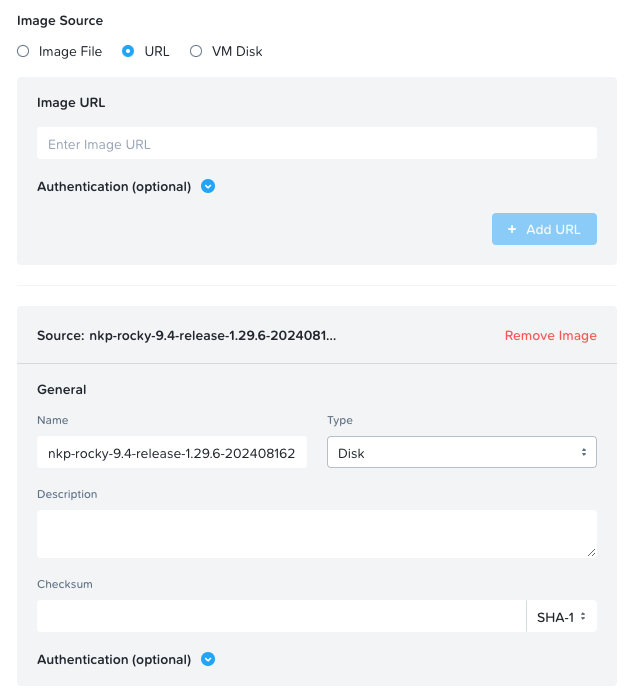
- Go to Prism Central → Images → Add Image
- Select Disk as the image type
- Upload the
.qcow2file - Note the exact image name, you'll reference it during cluster creation
Important
Do not rename the image downloaded from the Nutanix Portal. The NKP preflight checks verify that the Kubernetes version is embedded in the image name (e.g., 1.34.3). Renaming it will cause validation failures.
Important
Each NKP major.minor version ships its own OS images tied to a specific Kubernetes version. NKP 2.17 uses K8s 1.34.x, NKP 2.16 uses 1.33.x, NKP 2.15 uses 1.32.x, and so on. Always download the OS image that matches your NKP version. Mixing versions will cause bootstrap failures.
Note
This pre-built image is different from NIB (Nutanix Image Builder), which is a tool built into the nkp CLI for building custom node images. NIB is used when you need RHEL, a GPU-enabled image, a FIPS-compliant build, or any OS customization (custom packages, drivers, hardening profiles). NIB supports Nutanix AHV, AWS (AMI), Azure, and GCP. For vSphere, image building uses the legacy konvoy-image tool instead. For Nutanix AHV with Rocky Linux or Ubuntu and no GPU/FIPS requirements, the pre-built image from the portal is all you need.
Deploying the Management Cluster
Set Environment Variables
Define your deployment parameters up front. This keeps the creation command clean and makes it easy to adjust.
# Required
export CLUSTER_NAME=my-nkp-mgmt
export NUTANIX_ENDPOINT=10.12.54.8
export NUTANIX_CLUSTER=PIKACHU
export NUTANIX_SUBNET=pika-vlan52-workloads
export CONTROL_PLANE_VIP=10.12.52.220
export LB_IP_RANGE=10.12.52.221-10.12.52.221
export NKP_IMAGE=nkp-rocky-9.7-release-cis-1.34.3-20260504011927.qcow2
export STORAGE_CONTAINER=nkp

# Optional: SSH access to nodes
export SSH_USERNAME=nkp-admin
export SSH_PUBLIC_KEY=~/.ssh/id_rsa.pub

# Optional: custom CIDRs (defaults shown)
export KUBERNETES_PODS_NETWORK=192.168.0.0/16
export KUBERNETES_SERVICES_NETWORK=10.96.0.0/12
Note
Replace these values with your environment. The IPs and hostnames shown are from the ITCS lab.
Create the Cluster
This single command handles the entire deployment, from bootstrap to a self-managed management cluster with Kommander and all platform services:
nkp create cluster nutanix \
  --cluster-name ${CLUSTER_NAME} \
  --endpoint "https://${NUTANIX_ENDPOINT}:9440" \
  --control-plane-prism-element-cluster ${NUTANIX_CLUSTER} \
  --control-plane-subnets ${NUTANIX_SUBNET} \
  --control-plane-endpoint-ip ${CONTROL_PLANE_VIP} \
  --control-plane-replicas 3 \
  --control-plane-vm-image "${NKP_IMAGE}" \
  --worker-prism-element-cluster ${NUTANIX_CLUSTER} \
  --worker-subnets ${NUTANIX_SUBNET} \
  --worker-replicas 4 \
  --worker-memory 32 \
  --worker-vm-image "${NKP_IMAGE}" \
  --kubernetes-service-load-balancer-ip-range "${LB_IP_RANGE}" \
  --csi-storage-container ${STORAGE_CONTAINER} \
  --ssh-username ${SSH_USERNAME} \
  --ssh-public-key-file ${SSH_PUBLIC_KEY} \
  --registry-mirror-url registry-1.docker.io \
  --registry-mirror-username ${DOCKERHUB_USERNAME} \
  --registry-mirror-password ${DOCKERHUB_PASSWORD} \
  --self-managed
Key Flags Explained
| Flag | Purpose |
|---|---|
--self-managed |
Makes the cluster manage its own lifecycle. The bootstrap KinD cluster pivots the CAPI controllers to the new cluster. On Nutanix AHV, Kommander is automatically installed with all default platform services. Other providers require a separate nkp install kommander step |
--registry-mirror-url |
Configures a Docker Hub registry mirror with authentication. Without this, Docker Hub enforces rate limits on unauthenticated pulls, which will cause image pull failures during Kommander deployment |
--csi-storage-container |
Tells the Nutanix CSI driver which storage container to use for persistent volumes |
--control-plane-endpoint-ip |
The virtual IP that kube-vip manages for API server HA. Must not be in your DHCP range |
--ssh-username / --ssh-public-key-file |
Creates a user on every node (CP + worker) with SSH public key authentication. Essential for debugging and support bundle collection |
Additional Flags Worth Knowing
These aren't needed for a basic deployment, but you'll want them in specific scenarios:
# Self-signed Prism Central certificate
--insecure=true                          # skip TLS verification for PC
--additional-trust-bundle /path/to/ca.pem  # add custom CA (keep under 16KB)

# HTTP proxy (corporate environments)
--http-proxy="${HTTP_PROXY}" \
--https-proxy="${HTTPS_PROXY}" \
--no-proxy="${NO_PROXY}"

# Custom CIDRs
--kubernetes-pod-network-cidr=${KUBERNETES_PODS_NETWORK} \
--kubernetes-service-cidr=${KUBERNETES_SERVICES_NETWORK}

# VM sizing
--control-plane-vcpus 4 \
--control-plane-memory 8 \
--worker-vcpus 8 \
--worker-memory 32

# Disable auto-onboarding to Prism Central
--onboard-to-prism-central=false

# Generate manifests without deploying (inspect before apply)
--dry-run --output=yaml

# Additional SAN for the API server certificate
--extra-sans "nkp.yourdomain.local"

# Skip specific preflight checks (use with caution)
--skip-preflight-checks=NutanixVMImage
Tip
If you're behind a corporate proxy, the --no-proxy list must include your pod and service CIDRs, the Prism Central IP, and all Kubernetes internal domains:
127.0.0.1,192.168.0.0/16,10.0.0.0/16,10.96.0.0/12,169.254.169.254,
localhost,kubernetes,kubernetes.default,kubernetes.default.svc,
kubernetes.default.svc.cluster,kubernetes.default.svc.cluster.local,
.svc,.svc.cluster,.svc.cluster.local
What Happens During Bootstrap
The --self-managed flag makes the deployment look like a single command, but under the hood NKP runs a multi-stage process. Understanding these stages helps when you need to debug a failed deployment.
Here's what happens step by step:
Step 1: Bootstrap cluster. The nkp CLI creates a temporary KinD (Kubernetes-in-Docker) cluster on your jump host. This lightweight cluster runs the CAPI and CAPX controllers needed to provision infrastructure.
Step 2: Provision VMs. CAPI creates Cluster, Machine, MachineDeployment, and ClusterResourceSet objects. CAPX translates these into API calls to Prism Central, which provisions VMs on AHV. Each VM gets bootstrapped with cloud-init data containing kubeadm configuration, Kubernetes binaries, and the CNI/CSI setup.
Step 3: Cluster initialization. CAPI waits for the control plane to become healthy (kubeadm init on the first CP node, kubeadm join on the rest). Workers join next. The CNI (Cilium) and CSI (Nutanix) drivers are deployed via ClusterResourceSets.
Step 4: Pivot. This is the key step. NKP deploys CAPI controllers onto the new Nutanix cluster (nkp create capi-components), then moves all CAPI resources from the KinD bootstrap to the Nutanix cluster (nkp move capi-resources). The cluster is now self-managing and owns its own Machine objects.
Step 5: Cleanup. The KinD bootstrap cluster is deleted (nkp delete bootstrap). It's no longer needed since the cluster is now self-managing.
Step 6: Kommander install. With --self-managed on Nutanix AHV, Kommander is automatically installed after the bootstrap is cleaned up. This deploys the default platform services via Flux CD HelmReleases. The exact set depends on your license tier (see below).
Note
If you need to run these steps manually (for debugging, or to customize Kommander before it installs), use the individual commands:
nkp create bootstrap
nkp create cluster nutanix ... # without --self-managed
nkp get kubeconfig --cluster-name ${CLUSTER_NAME} > ${CLUSTER_NAME}.conf
nkp create capi-components --kubeconfig ${CLUSTER_NAME}.conf
nkp move capi-resources --to-kubeconfig ${CLUSTER_NAME}.conf
nkp delete bootstrap
nkp install kommander --installer-config kommander.yaml --kubeconfig ${CLUSTER_NAME}.conf
What Kommander Deploys
The number and type of HelmReleases Kommander deploys depends on your license tier. With a Starter license, you get the foundational apps only. Pro and Ultimate progressively add monitoring, logging, backup, and fleet management services.
Starter License (~14 HelmReleases)
| Category | HelmReleases |
|---|---|
| Core Platform | kommander, kommander-appmanagement, kubefed, reloader |
| Networking / Ingress | traefik, traefik-forward-auth-mgmt |
| Authentication | dex, dex-k8s-authenticator |
| GitOps | kommander-flux, git-operator |
| Security | cert-manager, gatekeeper |
| Other | kube-oidc-proxy, gateway-api-crds, nkp-pulse-management |
Pro / Ultimate License (~24 HelmReleases)
Everything from Starter, plus:
| Category | HelmReleases |
|---|---|
| Monitoring | kube-prometheus-stack, prometheus-adapter |
| Logging | fluent-bit, grafana-loki, grafana-logging, logging-operator |
| Storage | rook-ceph, rook-ceph-cluster |
| Backup | velero |
| UI / Access | kubernetes-dashboard, kubetunnel |
Ultimate adds on top: centralized-grafana, karma, thanos for multi-cluster metrics aggregation and fleet management.
Additional apps like Harbor, NKP Insights, OpenCost, NVIDIA GPU Operator, Istio, and Knative are available but must be explicitly enabled regardless of license tier.
Tip
If the auto-install takes too long or you need to customize which apps get deployed, you can generate a configuration file first and install Kommander separately:
# Generate default config
nkp install kommander --init > kommander.yaml

# Edit kommander.yaml to enable/disable apps or override Helm values
# Then install manually:
nkp install kommander \
  --installer-config kommander.yaml \
  --kubeconfig ${CLUSTER_NAME}.conf
The kommander.yaml file uses this structure:
apiVersion: config.kommander.mesosphere.io/v1alpha1
kind: Installation
apps:
  nvidia-gpu-operator:
    enabled: true    # enable an optional app
    values: |        # override Helm chart values
      toolkit:
        version: v1.17.5-ubi8
  rook-ceph-cluster:
    enabled: true
    values: |
      cephClusterSpec:
        storage:
          useAllDevices: true
Verify the Cluster
Once creation completes, run a full verification. This is more than just checking nodes. You want to confirm that every layer of the platform is healthy.
# Get the kubeconfig
nkp get kubeconfig --cluster-name ${CLUSTER_NAME} > ${CLUSTER_NAME}.conf
export KUBECONFIG=${CLUSTER_NAME}.conf
1. Nodes
kubectl get nodes
NAME                                   STATUS   ROLES           AGE   VERSION
my-nkp-mgmt-cp-xxxxx-xxxxx            Ready    control-plane   12m   v1.34.3
my-nkp-mgmt-cp-xxxxx-yyyyy            Ready    control-plane   10m   v1.34.3
my-nkp-mgmt-cp-xxxxx-zzzzz            Ready    control-plane   8m    v1.34.3
my-nkp-mgmt-md-0-xxxxx-xxxxx-aaaaa    Ready    <none>          7m    v1.34.3
my-nkp-mgmt-md-0-xxxxx-xxxxx-bbbbb    Ready    <none>          7m    v1.34.3
my-nkp-mgmt-md-0-xxxxx-xxxxx-ccccc    Ready    <none>          6m    v1.34.3
my-nkp-mgmt-md-0-xxxxx-xxxxx-ddddd    Ready    <none>          6m    v1.34.3
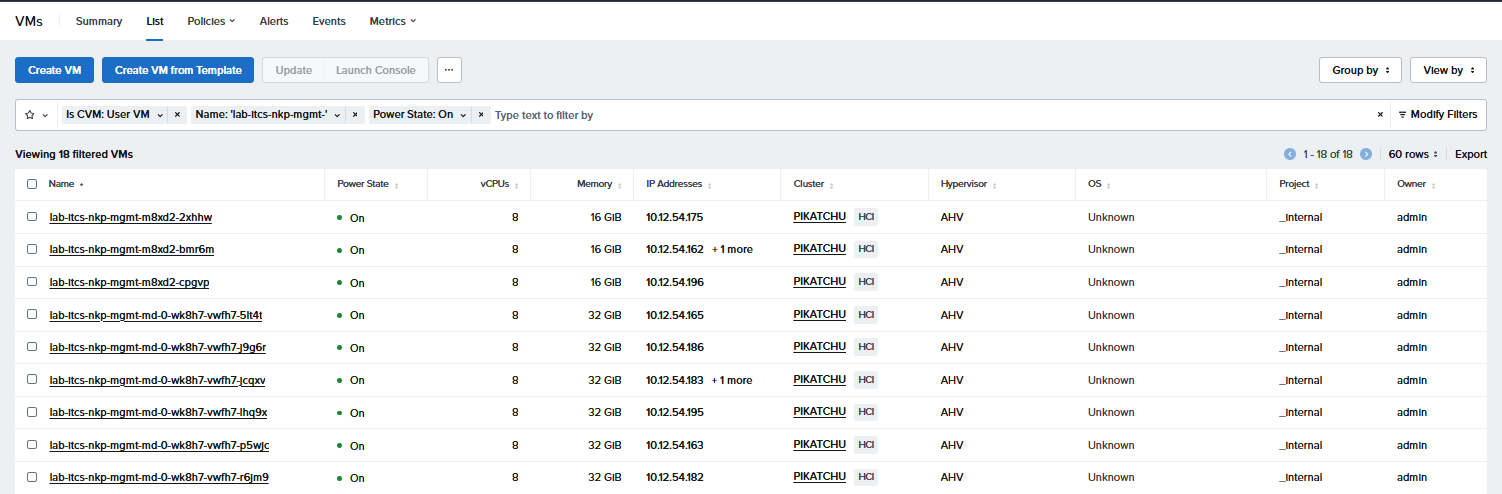
You should see 3 control plane nodes and 4 workers, all in Ready status.
2. CAPI Infrastructure
# CAPI providers
kubectl get pods -n capx-system
kubectl get pods -n caren-system

# Cluster and machine status
kubectl get clusters.cluster.x-k8s.io -A
kubectl get machines.cluster.x-k8s.io -A
All machines should show Phase: Running. The cluster should show Phase: Provisioned.
3. Kommander Platform Services
# Wait for all HelmReleases to become Ready (up to 15 minutes)
kubectl -n kommander wait --for condition=Ready helmreleases --all --timeout 15m
This command blocks and shows each HelmRelease reaching Ready state. If you want to watch them in real time:
kubectl -n kommander get helmreleases -w
4. Storage
# CSI driver pods
kubectl get pods -n ntnx-system

# Default StorageClass
kubectl get storageclass
You should see nutanix-volume as the default StorageClass.
5. Networking
# Cilium status
kubectl get pods -n kube-system -l app.kubernetes.io/name=cilium

# MetalLB
kubectl get pods -n metallb-system

# Traefik (ingress)
kubectl get svc -n kommander traefik
The Traefik service should have an EXTERNAL-IP assigned from your MetalLB range.
Access the Dashboard
Once all platform services are deployed, access the Kommander dashboard. NKP provides two commands for this:
nkp open dashboard: opens the Kommander dashboard URL directly in your web browser. Best for quick interactive access from the jump host.nkp get dashboard: prints the dashboard URL and credentials to stdout without opening a browser. Use this when you need to copy the URL to access from a different machine, or to share credentials with a colleague.
# Interactive: opens browser directly
nkp open dashboard --kubeconfig=${CLUSTER_NAME}.conf

# Non-interactive: prints URL and credentials
nkp get dashboard --kubeconfig=${CLUSTER_NAME}.conf

To get the initial admin credentials:
kubectl -n kommander get secret dkp-credentials \
  -o go-template='Username: {{.data.username|base64decode}}{{ "\n"}}Password: {{.data.password|base64decode}}{{ "\n"}}'
Log in with the decoded username and password.
Important
Rotate the default admin password after your first login:
nkp experimental rotate dashboard-password
Tip
The dashboard is served through Traefik on the MetalLB IP. Configure a DNS record pointing to that IP (e.g., nkp.yourdomain.local) and add it as an extra SAN with --extra-sans during cluster creation for clean browser access.
Advanced Configuration
SSH Access to Nodes
If you passed --ssh-username and --ssh-public-key-file during cluster creation, NKP created the user on every node with public key authentication. To connect:
# Find node IPs
kubectl get nodes -o wide

# SSH into a node
ssh nkp-admin@<node-ip>
SSH access is essential for collecting support bundles and debugging node-level issues like kubelet failures, disk pressure, or network problems.
Failure Domains
For production deployments, you can spread control plane nodes across multiple Prism Element clusters for hardware-level fault tolerance. This requires NKP 2.16+ and has strict requirements:
| Requirement | Detail |
|---|---|
| Network latency | < 10ms RTT between failure domains (etcd sensitivity) |
| L2 subnet | All CP failure domains must share an L2 subnet (kube-vip uses ARP) |
| Storage container | Same name must exist in every failure domain PE cluster |
Warning
Persistent volumes are not portable across failure domains. If a PE cluster fails and cannot recover, NKP does not replicate storage volumes to other failure domains. Use NDK (Nutanix Data Services for Kubernetes) for application-level data protection.
Define failure domains as CRDs:
apiVersion: infrastructure.cluster.x-k8s.io/v1beta1
kind: NutanixFailureDomain
metadata:
  name: fd-pe-cluster-1
  namespace: my-nkp-mgmt   # same namespace as the Cluster object
spec:
  prismElementCluster:
    type: name
    name: PE-Cluster-1
  subnets:
    - type: name
      name: shared-subnet
---
apiVersion: infrastructure.cluster.x-k8s.io/v1beta1
kind: NutanixFailureDomain
metadata:
  name: fd-pe-cluster-2
  namespace: my-nkp-mgmt
spec:
  prismElementCluster:
    type: name
    name: PE-Cluster-2
  subnets:
    - type: name
      name: shared-subnet
Then reference them in your cluster topology:
topology:
  controlPlane:
    replicas: 3
    variables:
      - name: clusterConfig
        value:
          controlPlane:
            nutanix:
              failureDomains:
                - fd-pe-cluster-1
                - fd-pe-cluster-2
The KubeadmControlPlane controller distributes control plane nodes across the configured failure domains as evenly as possible.
GPU Node Pools
NKP supports NVIDIA GPU passthrough and NVIDIA GRID vGPU (from NKP 2.16+). GPU support requires a custom OS image since Rocky Linux does not support GPU. Use Ubuntu 22.04/24.04 or RHEL 8.10/9.6 instead.
Build a GPU-enabled image with NIB:
# GPU passthrough
nkp create image nutanix \
  --gpu-name=${GPU_NAME} \
  --cluster=${NUTANIX_CLUSTER} \
  --endpoint=${NUTANIX_ENDPOINT} \
  --subnet=${NUTANIX_SUBNET} \
  ubuntu-22.04

# vGPU (requires NVIDIA GRID driver runfile)
nkp create image nutanix \
  --vgpu-runfile=/path/to/NVIDIA-Linux-x86_64-535.183.01-grid.run \
  --gpu-name="${VGPU_PROFILE}" \
  --cluster=${NUTANIX_CLUSTER} \
  --endpoint=${NUTANIX_ENDPOINT} \
  --subnet=${NUTANIX_SUBNET} \
  ubuntu-22.04
Then enable the NVIDIA GPU Operator in your kommander.yaml:
apps:
  nvidia-gpu-operator:
    enabled: true
    values: |
      toolkit:
        version: v1.17.5-ubuntu20.04    # match your OS
MetalLB: L2 vs BGP
The initial MetalLB configuration created during cluster setup uses L2 mode with ARP. This is the simplest setup but has a limitation: a single node "owns" each IP, so there's no true load distribution across nodes.
For environments with BGP-capable routers, you can switch to BGP mode for proper traffic distribution:
# L2 mode (default)
apiVersion: metallb.io/v1beta1
kind: IPAddressPool
metadata:
  name: default
  namespace: metallb-system
spec:
  addresses:
    - 10.12.52.221-10.12.52.230
---
apiVersion: metallb.io/v1beta1
kind: L2Advertisement
metadata:
  name: default
  namespace: metallb-system
spec:
  ipAddressPools:
    - default
# BGP mode
apiVersion: metallb.io/v1beta2
kind: BGPPeer
metadata:
  name: upstream-router
  namespace: metallb-system
spec:
  myASN: 64500
  peerASN: 64501
  peerAddress: 10.0.0.1
---
apiVersion: metallb.io/v1beta1
kind: IPAddressPool
metadata:
  name: default
  namespace: metallb-system
spec:
  addresses:
    - 10.12.52.0/24
---
apiVersion: metallb.io/v1beta1
kind: BGPAdvertisement
metadata:
  name: default
  namespace: metallb-system
spec:
  ipAddressPools:
    - default
Note
MetalLB IP ranges must not conflict with your pod or service CIDRs. The NKP dashboard UI uses the first IP in the MetalLB range for Traefik.
Dry-Run Mode
Before deploying, you can generate all the CAPI manifests without actually creating anything:
nkp create cluster nutanix \
  ... (same flags as above) \
  --dry-run --output=yaml > cluster-manifests.yaml
This outputs every Kubernetes resource NKP would create: Cluster, MachineDeployment, ClusterResourceSet, Secrets, ConfigMaps, and more. Review them, commit them to Git, or use them as a base for GitOps workflows.
You can also split manifests into separate files:
nkp create cluster nutanix \
  ... \
  --dry-run --output=yaml --output-directory=./manifests/
Troubleshooting
Here are the most common issues we've seen during deployments:
| Symptom | Cause | Fix |
|---|---|---|
| KinD bootstrap fails | Docker not running or insufficient resources | Ensure Docker is running with 8+ GiB available |
| VMs not appearing in Prism Central | Wrong PE cluster or subnet name | Verify names match exactly (case-sensitive) |
| Control plane timeout | VIP conflict or network issue | Ensure VIP is outside DHCP range and reachable |
| Nodes stuck in NotReady | OS image mismatch or wrong image name | Verify image name matches exactly what's uploaded in PC |
| Kommander pods CrashLoopBackOff | Docker Hub rate limiting | Use --registry-mirror-* flags with DockerHub credentials |
| HelmReleases stuck | Image pull failures | Run kubectl get helmreleases -n kommander to identify the failing app |
| PC API auth failures | Wrong credentials or insufficient permissions | Verify the PC user has the minimum CAPX role permissions listed above |
Bootstrap Debugging
For bootstrap issues, the most useful debug command is:
docker logs -f $(docker ps -q --filter name=konvoy)
This shows real-time CAPI controller logs during cluster creation.
Post-Deployment Debugging
# Check CAPI cluster status
kubectl get clusters.cluster.x-k8s.io -A

# Check machine status
kubectl get machines.cluster.x-k8s.io -A

# Check CSI driver
kubectl get pods -n ntnx-system
Recovering a Stuck HelmRelease
If a HelmRelease enters an exhausted or rollback in progress state, you can force Flux to re-reconcile it by toggling suspend:
# Suspend
kubectl -n kommander patch helmrelease <NAME> --type='json' \
  -p='[{"op": "replace", "path": "/spec/suspend", "value": true}]'

# Unsuspend (triggers fresh reconciliation)
kubectl -n kommander patch helmrelease <NAME> --type='json' \
  -p='[{"op": "replace", "path": "/spec/suspend", "value": false}]'
If the entire Kommander installation fails, simply rerun the install since it's safe to retry:
nkp install kommander \
  --installer-config kommander.yaml \
  --kubeconfig ${CLUSTER_NAME}.conf \
  --wait-timeout 1h
Tip
If a deployment fails mid-way, clean up before retrying: nkp delete bootstrap removes the KinD cluster, and delete any orphaned VMs in Prism Central.
What's Next
This was the simplest deployment path: internet-connected with direct access to container registries. In production, especially in regulated sectors like banking or government, that's often not an option.
Part 3: Air-Gapped Deployment covers both air-gapped methods: deploying from a local registry mirror (Harbor) and deploying directly from bundle files. We'll walk through the full process of seeding a registry and creating a cluster without any internet access.
Further in the series: Part 4 covers Day 2 configuration (authentication, RBAC, storage). Part 5 covers workload clusters and applications, and Part 6 covers operations.
For an architecture refresher, head back to Part 1.
Summary
We deployed an NKP 2.17 management cluster on Nutanix AHV: from Prism Central prerequisites and permissions, through network planning and OS image preparation, to the CAPI bootstrap process and its six-stage pivot mechanism. We covered the HelmReleases that Kommander deploys per license tier, the full verification checklist, and advanced topics like failure domains, GPU node pools, MetalLB modes, and the kommander.yaml customization workflow.
The internet-connected method with --self-managed is the fastest path to a fully operational cluster. For environments where internet access is restricted, Part 3 covers air-gapped deployment with both registry mirror and bundle approaches.